Sometimes I imagine what it would be like to be an awesomely creative and successful crafter. I’d have bins, baskets, drawers, and cupboards full of all the essential crafting supplies so I would be prepared anytime the crafting bug bit. I’d have neat little craft projects lined up for my toddler to do on rainy days that would then fill my fridge door, mantle, and living room walls when completed. I’d probably even be a member of a crafting group that gets together weekly to craft, discuss crafty topics, and whatever else crafty people do when they get together. Alas, I am not naturally crafty. Not one little bit. I’m not the awesomely creative crafter mentioned above. I do not have bins, baskets, drawers, or cupboards full of craft supplies. Nor do I have a bunch of craft ideas just waiting to be crafted, and henceforth, no completed toddler masterpieces filling my house. Even though I’m as non-crafty as they come, I do occasionally feel the urge to craft. So what do I, the non-crafter with no crafting supplies, do when the crafting urge strikes? Usually nothing! I have a tendency to get so overwhelmed by the prospect of starting a craft from scratch without a ready stock of supplies that I quickly lose interest. But not this time! This time I actually followed through and satisfied my urge to get my craft on! I started by losing hours of my life scouring Pinterest (of course!). I was looking for more than just inspiration. Since I’m not overly creative, I wanted some structure to guide this foray into the crafting world. I looked for a simple craft that didn’t require a whole lot of talent, supplies, or time. It also had to include a list of required supplies and directions for completing the project. My real goal in hunting down a craft project was to find something I could do with my two-year old, but in the end, I was drawn to a craft that I would have to do myself (or at least a majority of it myself). What craft did I select you ask? Popsicle Stick Frames as featured on the eighteen25 blog. 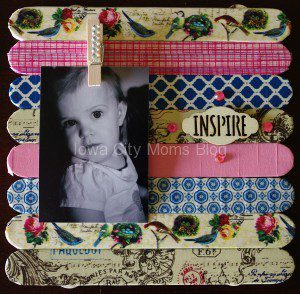 I was drawn to the fun colors and designs of the washi tape and the minimal supplies. Upon first glance, this project definitely looked doable for me, and the fact that I wasn’t scared off once I read through the minimal directions also boded well for me! Supplies I used (not all are pictured below):
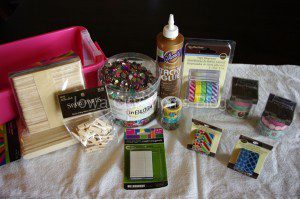
- Washi tape
- Large and regular sized Popsicle sticks
- Small clothes pins (could also use push pins)
- Tacky glue
- Small magnets
- Wooden letter (optional)
- Acrylic paint (optional)
- Small, wood embellishments (optional)
- Plastic jewels (optional)
- Friend (optional, but highly recommended)
This craft is very budget-friendly and allows you to get a little creative with the accessories you choose to use. I ended up finding the wood embellishments in the $1 bin at Michaels and the letter “C” was on clearance for 49₵! Those good finds made up for the fact that I bought way more washi tape than I needed – turns out I have a bit of a weakness for washi tape and all the fun, colorful patterns it comes in! In fact, after I successfully completed this craft with three frames stuck nicely on my fridge (and quite a bit of washi tape yet to be used), I randomly discovered that Target also sells washi tape – and proceeded to buy many more rolls! I’ll eventually use them for something, right? Directions:
- First, I convinced a friend to do the craft with me, which made it so much more fun! But don’t worry if you don’t have any crafty friends, your frames will turn out great even if you don’t have a friend by your side!
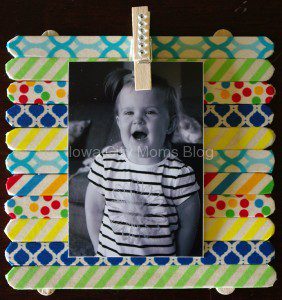
- Cover the Popsicle sticks with washi tape; don’t be afraid to mix colors and patterns. If your washi tape is narrow, you can either run two or more strips down the length of the stick, or use shorter pieces running across the width. For the larger frames, I used 8 large Popsicle sticks, and for the smaller one I used 11 regular sticks.
- Flip the sticks over and line them up next to each other. Take two more plain sticks, add a line of tacky glue, and glue them to the back of the covered sticks, so each plain stick is lying across all of the covered sticks. Press firmly and allow to dry. You can also lay something heavy on top of the frame to help the sticks fuse together more securely.
- If you’re using small clothes pins, decide where you want your clothes pin to be and glue it on with tacky glue. Let sit until dry.
- Flip the frame over and use tacky glue to affix magnets. How many magnets, and where you put them, will depend on the type of magnet you’re using. I used four, square magnets placed on the plain sticks near each corner.
Optional/Helpful Ideas:
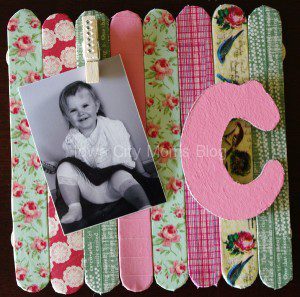
- Affix your clothes pin further right or left and add a small, wooden letter to the other side. I used the letter “C” for my daughter’s first name and painted it with gray and pink acrylic paint to match the colors of the frame.
- Before affixing your clothes pin, it can also be helpful if you already have the picture you plan to use to help you determine just where you want the clothes pin to go.
- Use wood embellishments and/or plastic jewels to fill the space next to the picture.
- I used black and white images to allow the patterns and colors of the washi tape to stand out.
- If you don’t want to use magnets, you could use string or yarn to create a hanging frame instead.
 Deciding to do this project, and actually completing it, has really gotten me into the crafting spirit! So much so that I even went out and bought myself a three-drawer cart to slowly fill with all my crafting supplies as I accumulate them. I decided my cart would live in my basement linen closet, which meant I had to do a little re-organizing. And in doing so, I discovered quite a few craft items I had stashed away in different places in my house – fun little surprise for me! So, if you’re like me and not much of a crafter but want to get started, try this fun and colorful craft for yourself. Or find something else more up your alley. Either way, roll up your sleeves and give it a try, you never know what kind of fun things you’ll learn and find along the way!
Do you know of any other beginner level crafts we could all try?








Your friend was not crafty, either, and totally had a blast! 🙂 I can’t wait to make more and tackle more crafts with you! Great post!