


My kids’ latest favorites and obsessions seem to come and go like the tides. The exception to this would be my youngest, whose love for “Frozen” may never die. (I’m sure I’m not the only mom wishing they could convince their child to “Let it Go”!) My kids love to have their rooms decorated with fun things from their current favorites, but I feel like it would break the bank to buy all new stuff every time they get into some new movie, TV show, or character. So, I started thinking about what I could do to make something fun for them to have on their walls without a high price tag. I’m not an amazing artist, so it had to be something simple. That’s when I hit on the idea of silhouettes.
Here are a few examples that I’ve made for my family for inspiration:
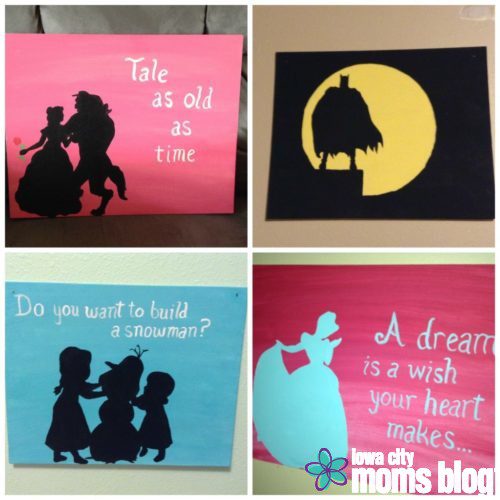
If your child has a favorite character, I’m sure there’s a fun way for you to showcase it with a quick and easy silhouette painting. Most of these have taken about 60-90 minutes to make. And, while they might not be 100% perfect, most kids are not exactly harsh critics of artistic skills, so don’t worry about perfection and just go for it.
What you’ll need:
- A computer and printer
- Scissors
- Canvas in the size you want. I usually use 11 x 14.
- A pencil
- Three paintbrushes: small angled, small round, and large flat brush.
- Acrylic paint in your chosen colors
That’s it. This is a pretty low-budget project. I typically pick up my supplies at WalMart, where you can buy a 3-pack of 11 x 14 canvases for under $5 and acrylic paint for 50 cents per bottle. I usually use 2-4 colors per painting. So for under $10, you can make a whole set of pictures for your child’s room.
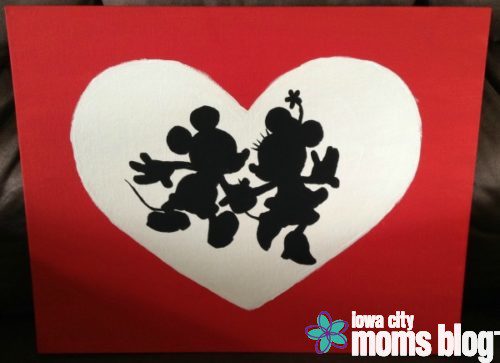
I’ll show you step by step how to make this Mickey & Minnie painting, and the same principles will apply to any other character silhouette painting you want to make.
Directions:
1. Choose your image.
Pick your child’s favorite character and do a quick google search for a silhouette image. Print it out, and then carefully cut it out. Now you have a stencil.
2. Paint your background.
Paint the background of your canvas with your large flat brush. You can do all one color, do streaks of complimentary colors, or gradients of a color going from dark to light by adding a little white and water to your paint. Paint the entire canvas, using left to right strokes that cover as much of the canvas as you can with what’s on your brush before reloading with more paint. Using broad strokes that go consistently in the same direction (left to right) will keep your brush strokes from showing too much, which keeps the background looking clean and simple for this project. If it looks a little splotchy, let it dry a bit and then give it a second coat.
3. Trace your image on the canvas.
Give the background of your painting a chance to dry. Then, place your cutout silhouette stencil on the canvas in the exact spot that you want to paint the image. Use your pencil and carefully trace the outline of the stencil onto the canvas.
4. Fill in your silhouette.
Using the color you’d like to fill in the silhouette and your small angled brush, begin filling in the area that you stenciled around. Just like when you try to stay in the lines with coloring, I like to paint the edges first, then fill in the rest. Be sure to cover up your pencil lines with the paint.
5. Finishing touches.
- If you have a quote that you’d like to use, using a ruler as a guide to keep your lines straight, use your small round brush to freehand paint the words that you’d like your painting to say. (Hopefully your painting “handwriting” will be a little better than mine!)
- If you’d like to make a dress sparkle or add some shimmer to a night sky background, go over the area you’d like to sparkle with a clear or lightly tinted shimmer or glitter paint.
- Fix up any areas that aren’t quite right (paint too light, lines not straight, etc.) using your small round brush.
How to Make Dancing Mickey & Minnie:
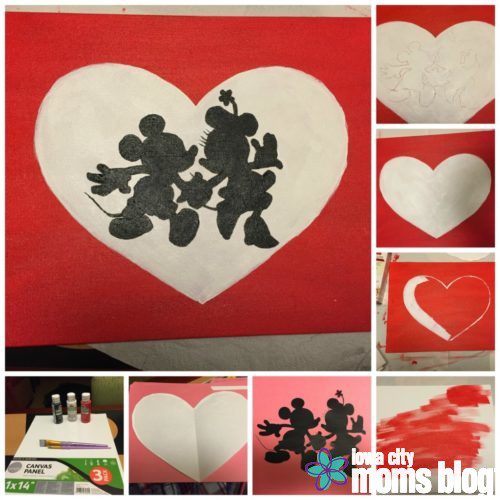
- Choose Your Image.
Here’s a link to the image I used to create a stencil. Print it and cut it out – it’s the perfect size for an 11 x 14 canvas. I also cut out a heart by folding an 8 ½ x 11 piece of paper in half and simply cutting a heart shape that I liked, just like when your kids make Valentines. - Paint Your Background.
Using a bright red paint, paint your entire canvas red. - Trace Your Image on the Canvas.
Place the heart on the middle of the canvas and trace it with a pencil. - Fill in the Silhouette.
Using white paint, completely fill in the heart. You may need to give it two coats to completely and evenly cover the red background. I used my wide flat brush for this. - Trace Your Image on the Canvas (Again).
Once the white paint has dried, position your Mickey & Minnie stencil in the middle of the heart and trace it with your pencil. - Fill in the Silhouette (Again).
Fill in the outline that you traced with black paint using your small angled brush. Give it a second coat if necessary. - Finishing Touches.
Go over any areas that might need straightening, a little thicker paint, etc. with your small round brush.
That’s all there is to it. Hope you have fun redecorating with your kids’ favorite characters!


