


I’m terrible at making magic for my kids. Santa gets (burnt) break-and-bake cookies, a Leprechaun has never snuck into our house and turned a gallon of milk green, and the only fireworks we watch are from the neighborhood hooligans setting them off in the field behind our house. I envy those Pinterest moms that transform their homes into other worlds for their children and wish I could make/bake/create that magic for my own kids. Garlands and glitter and feathers, oh my!
But you want to know what happens when I try? I get frustrated, stressed out, and end up yelling at someone.
I was chatting with a friend of mine that is amazing at making magic for her children. Her home is always decorated per the season and she’s constantly posting pictures of her family doing some sort of wonderful new tradition. Her daughters’ eyes are always twinkling and she doesn’t even need to use a Snapchat filter. I told her I was jealous of how gracefully she created these moments for her girls and her response was:
“Well yeah, but you do those awesome box things with your kids! I’m jealous of those!”
Wait a second. I DO do those box things with my kids! And I like to make them! And my kids really enjoy playing with them! Could I be making magic for my children and not even know it?!?
A lot of people hear the words “sensory play” and immediately shudder.
Sensory play is a huge part of our regular routine. I would much rather play with goop than glue (unless the glue was used to make the goop) so I frequently do sensory play with my kiddoes instead of crafts. A lot of people hear the words “sensory play” and immediately shudder. They think of rice being dumped on floors and shaving cream smeared on the couch. Hours of dyeing noodles and bird seed in places bird seed should never be. But trust me—it doesn’t have to be this way! Over the years of weekly (and sometimes daily) sensory play I have found some tricks to make it fun, engaging, and EASY.
With the holidays coming up, I thought I’d share how I make magic with my children using themed sensory play boxes.
THE PREP
I don’t recommend just jumping into sensory play. Throwing down a bag of dried beans and walking away is just asking for disaster. First of all, designate a space for your sensory play. Ideally it will be in your kitchen or other room without carpet. If you have a small table and chairs that’s a great spot, too, but we always do it right on the floor. I feel like my kids can move around easier and there’s less chance for accidental spills, tips, and falls when they’re sitting on the ground. We lay out a yoga mat which gives them a clear boundary for where the materials are to stay.
You’ll be tempted to make your child keep everything inside of the box but the first thing they’ll want to do is pick something out. THAT’S OKAY! You and your kids will enjoy sensory play much more if you let them have a large but defined space to explore. My kids can do whatever they want with the things in the box as long as it stays on the mat. A waterproof picnic blanket is another great option to keep things contained and easily cleaned up. For the box itself I recommend something with a lid that can stack easily for storage.
THE MATERIALS
First, you’ll need a “base.” This is typically the smaller material that will be scooped, poured, and dumped. IT DOESN’T NEED TO BE RICE! While rice is a common sensory bin base, it drives me bonkers to pick it up if it gets off our mat. Our favorite thing to use is beans but other common sensory bin bases include:
-pompoms (small or large)
-shredded paper
-dried noodles
-pony beads
-pea gravel
-popcorn kernels
-cotton balls
If you have a child in the, “I’m putting it in my mouth and you can’t stop me!” phase, you can skip the base and just put in your larger materials. They will have just as much fun exploring and you can avoid having to karate chop choking hazards out of their hands every three seconds.
Once you have your box and your base, you can add any other materials that follow your theme. Try to find things with a unique texture, shape, or sound. My favorite places to pick things up are the Target dollar spot, Michael’s, and Hobby Lobby.
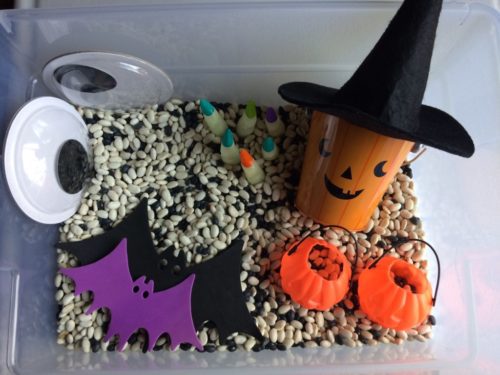
This is what we have in our Halloween box:

All put together:
This is what we have in our Thanksgiving/ Fall box:
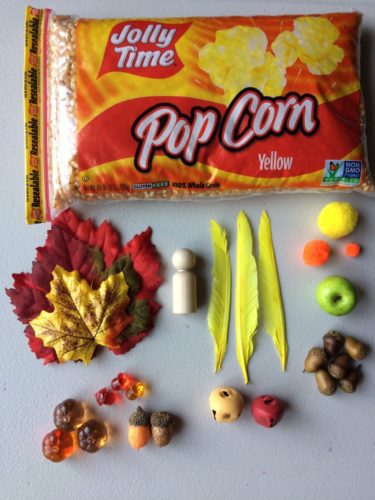
All put together:

THE PLAY
Step 1: Put down your mat
Step 2: Put down your box
Step 3: Sit back and watch the magic happen
Observe your child (quietly, if you can) and see what they like doing with the materials. My kids like to empty/fill/transfer. Some kids immediately jump into imaginary play and the ghosts start battling the pumpkins. Some kids like to dump. If your kiddo immediately takes the box and tips it upside down, try putting the sensory bin into a larger container so that they can get that “thrill of the dump” without sending things shooting under the fridge.
Your goal is to set up the environment to let them play how they want to play without having to constantly correct their behavior. It’s no fun being told, “You’re playing wrong!” and that’s exactly what your child will hear if you keep telling them, “Don’t make a mess!” Set them up for success by putting your sensory box into one of those totes that slide under your bed. A small plastic kiddie pool is another great option.
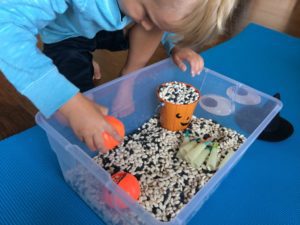
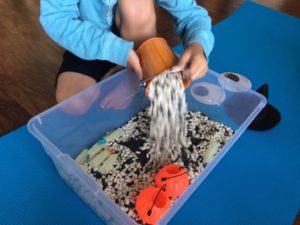
Action shots:
Optional Step 4: Items To Engage
You can keep your child engaged in play by introducing items that help them move the materials around. They don’t have to be anything fancy—just look in your silverware drawer for starters! Common items you can use to engage your kiddo include:
-spoons
-measuring cups
-funnels
-toilet paper or paper towel rolls
-squeezy bottles
We have a tote filled with these things that just gets plopped down right next to our sensory box.
THE EXCHANGE
I’m not gonna lie, when I first started putting together sensory boxes it was expensive and took a lot of energy to go to 3 or 4 different stores looking for things that would work well. Mama ain’t got time for that! Two years ago I had an epiphany and set up a Sensory Exchange with other families that enjoyed this type of play. Five other moms came over and we each brought an empty box and $5 worth of materials. We then distributed everything evenly into each other’s boxes and walked away with a variety of different things to play with.
If you are interested in setting up a Sensory Exchange but don’t know who to ask, put a shout out in one of our neighborhood playgroup Facebook groups! Not only will you get your sensory box set up, but you’ll meet some awesome mamas too. Win-win!
THE BLOOPER
It’s no secret that I’m not perfect. I was super excited to bring decorative gourds from Target to our Sensory Exchange for our Fall/ Thanksgiving box. They looked so life-like! Well, that’s because they were real. I didn’t find out, however, until they started to rot. Moral of the story: know if what you’re putting in your box is non-perishable and keep your eye on it if it’s not. Whoops!
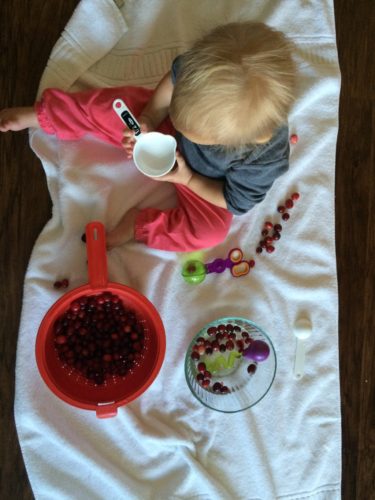
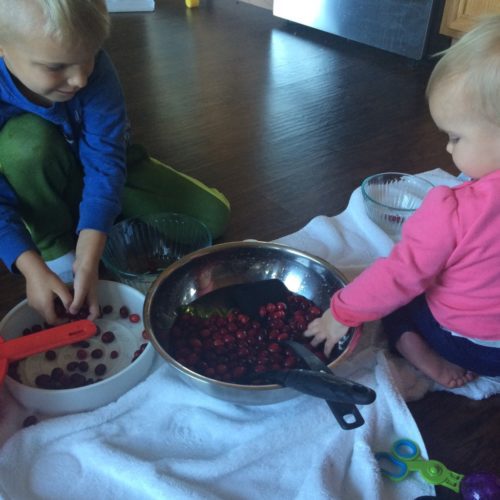
THE BONUS
Fall is also when we do a lot of sensory play with cranberries. I buy two bags of cranberries, set up some bowls with a little bit of water, and let the kids go nuts. When they’re done I drain the cranberries and store them in the refrigerator until the next time they want to play. We can get 3 or 4 sessions of play before I have to toss them.
So as the best season of the year starts (all you summer-loving mamas are crazy), make some magic with your little one by trying out some stress-free sensory play!
SaveSave


