I love being outside. I love the fresh air, the sun, and all of the colorful plants in our yard. The problem though, is that when we moved into our house, it was brand new. A brand new house, while pristine on the inside, is pretty darn boring on the outside. Unless of course you have a lot of extra cash on hand and can have your yard instantly landscaped by professionals.
Our front yard is beautiful and full of gorgeous plants that give it a pretty look in the summer. This is all due to the fact that my dad, who is a retired professional in the landscaping field, drew out the plans and helped us execute what now has become my favorite space in our yard.
I really enjoy taking care of plants and making our yard look nice. Our backyard is far from what I would like it to be, but we do have some nice plants that we planted when we first moved in 6 years ago. We just didn’t have the funds to finish out the landscaping plans that my dad created for our backyard. This has left us with a lot of the color green (mainly evergreens, pussy willows, & hostas), but hardly any other color whatsoever.
This summer I decided instead of just looking at the same boring backyard, why not make something colorful to display? I wanted something that was cheaper than plants, but would add a little pop of color within all of the greenery. I decided to get my 4-year-old daughter involved, and together we crafted out the project below. I must say I was a little skeptical at first that our “art” would look cheesy hanging up, but I think they look rather nice, and my daughter is proud that she helped make them.
For our project, I decided to try something that I have seen on Pinterest multiple times. I always think it looks cool, but I always worried that in real life, with myself as the crafter, it would turn out more like those “Nailed It” pictures. My daughter and I went for it though and created several melted bead sun catchers.
I was pleasantly surprised at how easy they were to make and also how durable they are. We hung one of them up right away when we made it and it has survived several severe thunderstorms already!
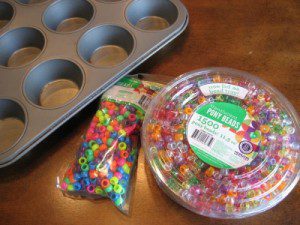 Here’s what you need to create a few sun catchers of your very own: pony beads from your favorite discount or craft store, a muffin tin, a drill, and some heavy duty fishing line. I must say that I was pretty nervous about putting beads in my muffin tins, so I used an older one that has seen better days. I wouldn’t have had to though because once completely cooled, the melted beads popped right out! You could also use a round cake pan if you wanted to make one larger sun catcher.
Now for the easy-as-pie directions:
- Fill your muffin tins with one layer of pony beads.
 You can dump them in or create any sort of pattern or design you would like. It doesn’t even matter if they are upright either! They can be on their side, and they will still melt the same way. The only thing that is a must for this step is that they have to be touching all sides of the pan, including the bottom.
 - Stick the filled muffin tins in a 400-degree oven for 25-30 minutes. You want the beads to melt completely, so it could take more or less time depending on your own oven. I have also read that you can do this outside on your grill, but we haven’t tried that variation.

- This step isn’t on most of the Pinterest versions, but open your windows and turn on any fans you may have. There will be a slight burning plastic smell, but it will quickly go away once the beads are out of the oven. We just used the 30 minutes as an opportunity to have a picnic lunch on our deck so that we didn’t have to deal with the stinky and probably not so healthy fumes.
- Once the beads are melted (they will be in a jelly-like state), take the pan out of the oven and let them cool. I stuck our pan on the cement floor of our front porch. They cooled pretty quickly this way and it helped the stinky plastic smell go away.
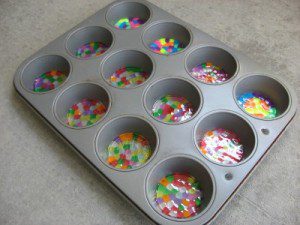
- After about 20 minutes or so (or however long it takes your melted beads to completely cool), pop them out of the tins. I had a couple that stuck just slightly, but with a little hit of the pan on the ground, they popped right out!
- Next, using a very small drill bit, create the holes needed to string the small pretty disks together. You can get as creative as you want with this step! There are some pretty cool ideas for ways to put them together that you can quickly look up online if you need a little inspiration.
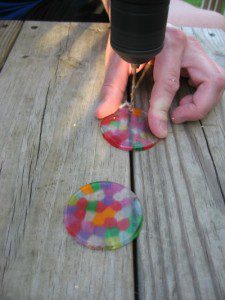
- The last step is to tie them together with a heavy-duty fishing line. I literally just grabbed what my husband had out of his tackle box and went to town on putting them together.
- Find a place to hang your sun catchers where you and those that visit your home can enjoy them. They can be hung up anywhere outside such as on a tree limb, plant hook, from the ceiling of a porch, etc. My daughter even hung one inside her playhouse in our backyard! They also are very pretty hanging inside on a window and even on a curtain rod in your child’s bedroom.
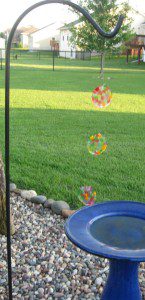
My daughter and I had a lot of fun creating our colorful yard art and have enjoyed watching them spin around in the wind. Now our backyard has that little pop of color I was looking for and is not so boring anymore! 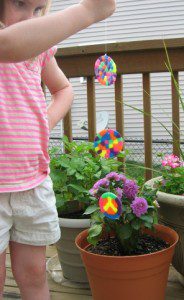 It’s your turn now though, so stop reading this and go get started on your own DIY sun catcher!





Those look so good, Melissa! We often do kid-made Christmas ornaments as family gifts and this looks like a fun new option for that, too. Though maybe we’d make them in the fall so we aren’t trying to leave the windows open when it’s super cold out.
Very nice! This was on my list for summer crafts as well! Thanks for all the extra hints about the smell etc. Plastic fumes can be toxic! Can’t wait to see them! And such a cute little helper!!